Synthesize By Default

In 2012 Apple introduced Synthesize By Default in Xcode. You no longer have to synthesize instance variables. Just declare them as you normally would in the .h file and the compiler will automatically synthesize them for you. I learned how to use Xcode before the transition so I just learned about this by accident. If you haven’t done so, watch these two videos from WWDC 2012: Session 405 – Modern Objective-C and Session 413 – Migrating to Modern Objective-C.

Synthesize By Default is not available for NSManagedObjects so if your header file contains something like this:


@interface WordList : NSManagedObject

You’ll have to synthesize.

You can still manually create setters or getters and the compiler will automatically create the other accessor.

One caveat. I stopped supporting iOS4.3 and still have code that is compatible with iOS4. Since doesn’t have the weak indicator, you need to change assign to weak, then delete the ‘__unsafe_unretained id delegate;’ line. Then you can delete the @synthesize. If you still want to support iOS4, you’ll need to synthesize these variables.

Before


@implementation PracticeSightWords
@synthesize delegate = _delegate;


@interface PracticeSightWords : UIViewController {
    
    __unsafe_unretained id <PracticeSightWordsDelegate> delegate;
}

@property (nonatomic, assign) id <PracticeSightWordsDelegate> delegate;

After


@interface PracticeSightWords : UIViewController 

@property (nonatomic, weak) id <PracticeSightWordsDelegate> delegate;

I have my compiler warnings Turned up to 11 so I needed to turn off the warnings for “Implicit Synthesized Properties” in the ‘Warnings-Objective C’ section of the build settings.

New Icons and Launch Images for iOS7

iOS7 requires new images for the icons and launch image and Xcode now provides a new way of validating that you have all of the required images.

Just to see what Xcode would do, I created a new app from scratch and looked at the images it requires.
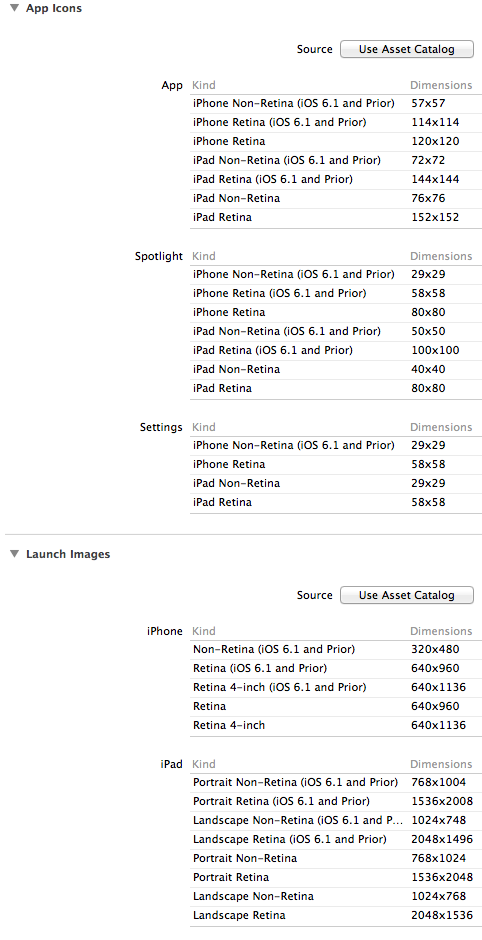
Launch Images

I then took a look at what an existing app looks like. The first thing I noticed is that I forgot to include the 100×100 iPad retina image. Then I noticed that the last four launch images are the same as the ones that I already have.
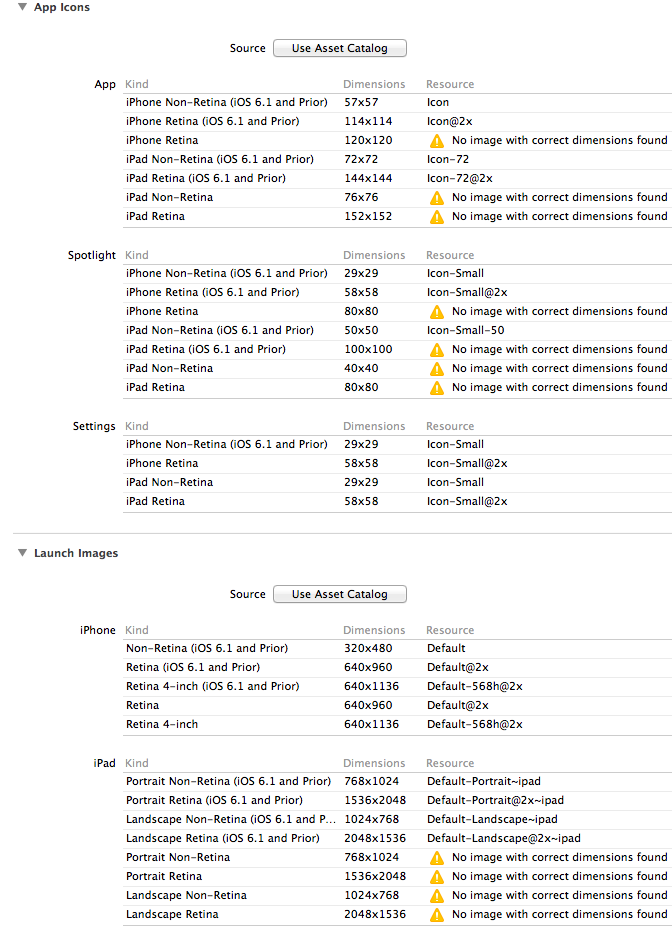
Launch Images

I manually added the Portrait Non-Retina and it automatically found the retina version. Then I added the Landscape Non-Retina and it found the retina. I looked in the .plist for the app and Xcode had added lines for the new files. Since I have over 20 apps I didn’t want to repeat this 20 or more times so I right-clicked on the file, opened the .plist as source, then copied the following lines.


<key>UILaunchImages~ipad</key>
  <array>
    <dict>
      <key>UILaunchImageMinimumOSVersion</key>
      <string>7.0</string>
      <key>UILaunchImageName</key>
      <string>Default-Landscape</string>
      <key>UILaunchImageOrientation</key>
      <string>Landscape</string>
      <key>UILaunchImageSize</key>
      <string>{768, 1024}</string>
    </dict>
    <dict>
      <key>UILaunchImageMinimumOSVersion</key>
      <string>7.0</string>
      <key>UILaunchImageName</key>
      <string>Default-Portrait</string>
      <key>UILaunchImageOrientation</key>
      <string>Portrait</string>
      <key>UILaunchImageSize</key>
      <string>{768, 1024}</string>
    </dict>
  </array>

I pasted these lines into the same place in each of the .plists.

While I was at it, I added a line to my pre-iOS7 images list for the file I forgot to include. That section now looks like this:


  <key>CFBundleIconFiles</key>
  <array>
    <string>Icon.png</string>
    <string>Icon@2x.png</string>
    <string>Icon-72.png</string>
    <string>Icon-72@2x.png</string>
    <string>Icon-Small-50.png</string>
                <string>Icon-Small-50@2x.png</string>
    <string>Icon-Small.png</string>
    <string>Icon-Small@2x.png</string>
  </array>

I then used Xcode to add the new images. (Note: As far as I can tell, you can name them anything you want. I followed a logical extension of the old rules.) I used the same image for Spotlight iPad Retina and iPhone Retina (80×80) so I name it Icon-402x.png.
Xcode added an iPad section to the .plist. The .plist now looks like this:


<key>CFBundleIconFiles</key>
  <array>
    <string>Icon-40</string>
    <string>Icon-iPhone-60</string>
    <string>Icon.png</string>
    <string>Icon@2x.png</string>
    <string>Icon-72.png</string>
    <string>Icon-72@2x.png</string>
    <string>Icon-Small-50.png</string>
    <string>Icon-Small-50@2x.png</string>
    <string>Icon-Small.png</string>
    <string>Icon-Small@2x.png</string>
  </array>
  <key>CFBundleIconFiles~ipad</key>
  <array>
    <string>Icon-40</string>
    <string>Icon-iPad-76</string>
    <string>Icon-iPhone-60</string>
    <string>Icon.png</string>
    <string>Icon@2x.png</string>
    <string>Icon-72.png</string>
    <string>Icon-72@2x.png</string>
    <string>Icon-Small-50.png</string>
    <string>Icon-Small-50@2x.png</string>
    <string>Icon-Small.png</string>
    <string>Icon-Small@2x.png</string>
  </array>

Xcode has a new folder type for Asset Catalogs. I did not convert my icons to asset catalogs, but it looks like a good way to manage assets.
Organizing the Rat’s Nest

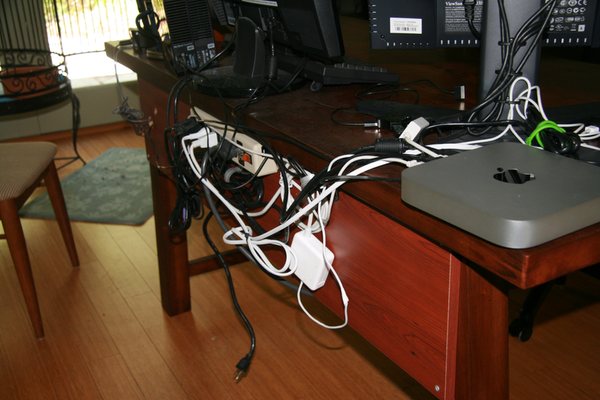
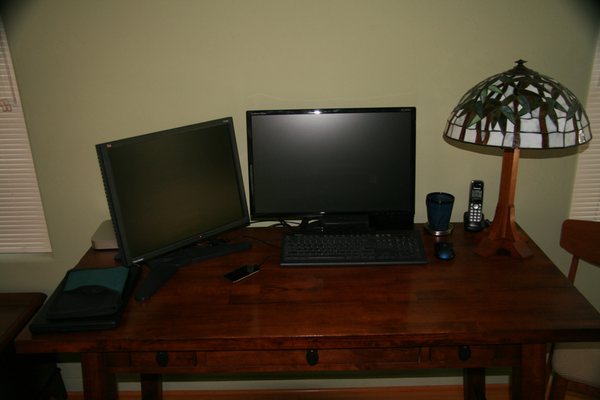
In a previous post I mentioned that I needed OSX Mountain Lion for development and that I moved from using a laptop to a Mac mini. After using the setup for a while, I moved the rat’s nest of cables out of sight behind the desk.

I picked up a shelf that is close to the color of the desk and bolted it to the back. Then I drilled a few holes in it for cables mounted all of the dongles and cables on the board. This is what used to be on the top of the desk. There are two power strips, one that is visible in the picture and another under the drawer.

Desk Rat’s Nest

And this is what the desk looks like now.

Desk

There is only one cable that the bird can chew and no power cords, so we’re both happy—he’s happy that he can help me type and I’m happy that he can’t electrocute us.

100,000 MySQL injection attacks in a few days

Recently my site has been hit with huge numbers of injection attacks. Right now, I trap them and return a static page.

Here’s what my URL looks like:


/products/product.php?id=1

This is what an attack looks like:


/products/product.php?d=-3000%27%20IN%20BOOLEAN%20MODE%29%20
UNION%20ALL%20SELECT%2035%2C35%2C35%2C35%2C35%2C35%2C35%2C35
%2C35%2C35%2C35%2C35%2C35%2C%27qopjq%27%7C%7C%27ijiJvkyBhO%27
%7C%7C%27qhwnq%27%2C35%2C35%2C35%2C35%2C35%2C35%2C35%2C35%2C35
%2C35%2C35%2C35%2C35%2C35%2C35%2C35%2C35%2C35%2C35%2C35%2C35

I know for sure that this isn’t just a bad link or fat-fingered typing so I don’t want to send them to an overview page. I also don’t want to use any resources on my site delivering a ‘missing’ page.

Based on a couple of comments on Stackoverflow, I looked up how to return ‘page not found’. This Stackoverflow answer by icktoofay suggests using a 404 and then the die(); – the bot thinks that there isn’t a page and might even go away, and no resources are used to display a page not found message.

Here’s what mostly works.


header("HTTP/1.0 404 Not Found");
die();

I still get attempts, but they usually only try 20 or so times and then they go away for a few days.

Reason #42 why you don’t want to pay me by the hour.

My mother-in-law is coming to stay for a while and she has trouble with steps. We put grab bars by all the places she has trouble with—the tub, the two steps up into the living room, the steps up from the garage, and on the stairs. We’re getting quite good at installing them securely.

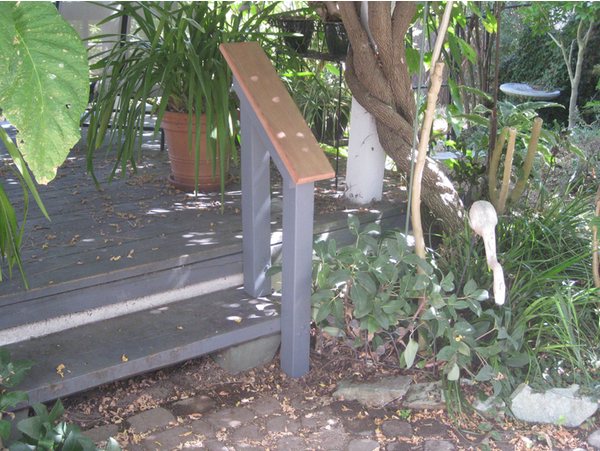
Deck Stair Rail

So I figured, how hard could it be to install a rail up to the deck? It wasn’t particularly hard, but it took 11 hours. Though to be fair, about an hour of that time was googling, talking to people about how to do it, and seeing how they installed a rail at the nearby hardware store.

In the end, it is very secure—no wobble at all. The posts are just about perfectly plumb in both directions and the top rail doesn’t wobble.

I think I could do the other side in a couple of hours. The first problem I ran into was that I couldn’t get the top post to sit on the step. Then it occurred to me that they had sloped the step just a tad to let the water flow off. Several iterations on the chop saw and I had it sitting flush on the step.

The next problem was tacking the rails up so that I could cut the tops. I ended up getting some 5 inch nails so that I could keep the posts in place while I marked the angle for the top rail. I had pre-drilled the holes, but none of my drill bits were 4″ long so they wouldn’t go all the way through the post. I ended up using the lag bolts to go through the post, then drilling a pilot hole where they dimpled the wood.

The angle for the rail ended up being 40° so it was easy to cut on the chop saw. There is an anchor piece under the rail that also has the same angle for each end.

I made the anchor piece and the top rail out of scrap redwood from an old deck. The surface was pitted and cracked, so I used the table saw to plane the edges. I tried to plane the top of the rail but the riv knife in the saw kept the board from going through the saw. A belt sander worked to smooth off the top and bottom. The edges were rounded for better grip with a router.