iOS Launch Images

Apple hasn’t updated the documentation yet for the new, larger, phones but you can easily find the size for the launch images using Xcode. If you look at the launch images you won’t see the new versions.

iOS Launch Images Old

If you have an existing app, you’ll need to press the add button to add the new set of images.

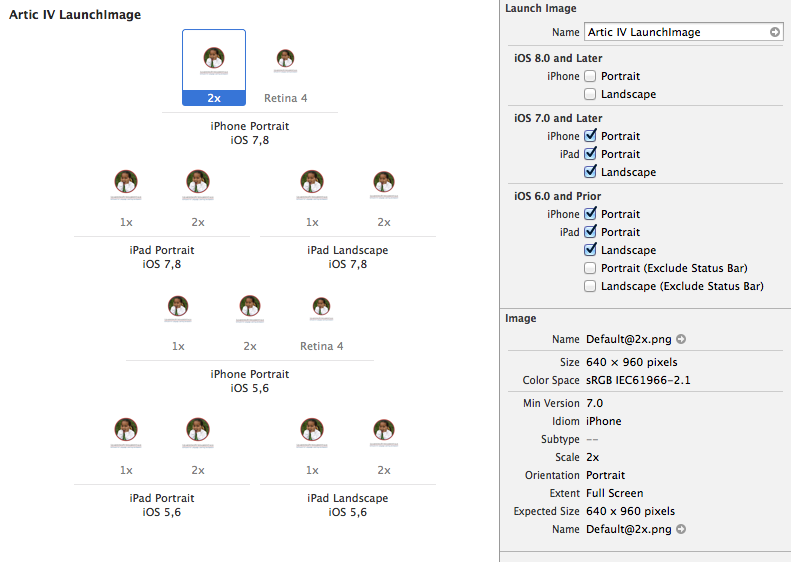
I cleaned up the asset file so there is just one set. I looks like this.

iOS Launch Images

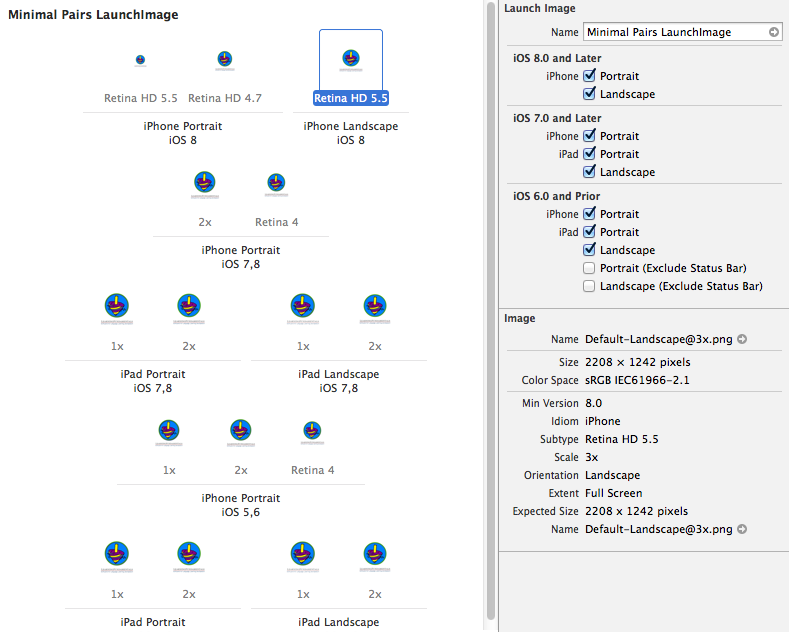
To view the sizes, select the image you are interested in and click the inspector. The size shows up at the bottom RHS. These are the new numbers.

iOS 8 iPhone Portrait
Retina HD 5.5 1242×2208
Retina HD 4.7 750×1334

iOS 8 Landscape
Retina HD 5.5 2208×1242

I have 27 apps in my project so I prefer to edit the .xcassets package directly, and add the files, rather than dragging and dropping into Xcode.

This is the JSON file I use in the image above. Note that some images are used in multiple phones. Since several versions use the same file size, if you add the files using Xcode, multiple copies of the file will be created. You don’t need multiple copies if you edit the JSON directly. You can use any names you want for the files. I kept the naming convention that was used before .xcassets files were introduced.


{
  "images" : [
    {
      "extent" : "full-screen",
      "idiom" : "iphone",
      "subtype" : "736h",
      "filename" : "Default-736h@3x.png",
      "minimum-system-version" : "8.0",
      "orientation" : "portrait",
      "scale" : "3x"
    },
    {
      "extent" : "full-screen",
      "idiom" : "iphone",
      "subtype" : "736h",
      "filename" : "Default-Landscape@3x.png",
      "minimum-system-version" : "8.0",
      "orientation" : "landscape",
      "scale" : "3x"
    },
    {
      "extent" : "full-screen",
      "idiom" : "iphone",
      "subtype" : "667h",
      "filename" : "Default-667h@2x.png",
      "minimum-system-version" : "8.0",
      "orientation" : "portrait",
      "scale" : "2x"
    },
    {
      "orientation" : "portrait",
      "idiom" : "iphone",
      "extent" : "full-screen",
      "minimum-system-version" : "7.0",
      "filename" : "Default@2x.png",
      "scale" : "2x"
    },
    {
      "extent" : "full-screen",
      "idiom" : "iphone",
      "subtype" : "retina4",
      "filename" : "Default-568h@2x.png",
      "minimum-system-version" : "7.0",
      "orientation" : "portrait",
      "scale" : "2x"
    },
    {
      "orientation" : "portrait",
      "idiom" : "ipad",
      "extent" : "full-screen",
      "minimum-system-version" : "7.0",
      "filename" : "Default-Portrait~ipad.png",
      "scale" : "1x"
    },
    {
      "orientation" : "landscape",
      "idiom" : "ipad",
      "extent" : "full-screen",
      "minimum-system-version" : "7.0",
      "filename" : "Default-Landscape~ipad.png",
      "scale" : "1x"
    },
    {
      "orientation" : "portrait",
      "idiom" : "ipad",
      "extent" : "full-screen",
      "minimum-system-version" : "7.0",
      "filename" : "Default-Portrait@2x~ipad.png",
      "scale" : "2x"
    },
    {
      "orientation" : "landscape",
      "idiom" : "ipad",
      "extent" : "full-screen",
      "minimum-system-version" : "7.0",
      "filename" : "Default-Landscape@2x~ipad.png",
      "scale" : "2x"
    },
    {
      "orientation" : "portrait",
      "idiom" : "iphone",
      "extent" : "full-screen",
      "filename" : "Default.png",
      "scale" : "1x"
    },
    {
      "orientation" : "portrait",
      "idiom" : "iphone",
      "extent" : "full-screen",
      "filename" : "Default@2x.png",
      "scale" : "2x"
    },
    {
      "orientation" : "portrait",
      "idiom" : "iphone",
      "extent" : "full-screen",
      "filename" : "Default-568h@2x.png",
      "subtype" : "retina4",
      "scale" : "2x"
    },
    {
      "orientation" : "portrait",
      "idiom" : "ipad",
      "extent" : "full-screen",
      "filename" : "Default-Portrait~ipad.png",
      "scale" : "1x"
    },
    {
      "orientation" : "landscape",
      "idiom" : "ipad",
      "extent" : "full-screen",
      "filename" : "Default-Landscape~ipad.png",
      "scale" : "1x"
    },
    {
      "orientation" : "portrait",
      "idiom" : "ipad",
      "extent" : "full-screen",
      "filename" : "Default-Portrait@2x~ipad.png",
      "scale" : "2x"
    },
    {
      "orientation" : "landscape",
      "idiom" : "ipad",
      "extent" : "full-screen",
      "filename" : "Default-Landscape@2x~ipad.png",
      "scale" : "2x"
    }
  ],
  "info" : {
    "version" : 1,
    "author" : "xcode"
  }
}

I didn’t feel like creating new launch images for all 27 apps, especially since Apple has hinted that there are new iPad sizes in the pipeline. So I switched to using a .xib file for the launch image.

Device types in iOS

I sometimes need to know the device type that the app is running on. I use this method in my Utilities class to do it. Updated for the new devices introduced in the fall of 2014.


+ (NSString *)deviceType {
    NSString *device = nil;
    CGSize screenSize = [[UIScreen mainScreen] bounds].size;
    CGFloat deviceScale = [UIScreen mainScreen].scale;

    if (UI_USER_INTERFACE_IDIOM() == UIUserInterfaceIdiomPhone) {
        device = @"iPhone Classic"; // Just in case it doesn't make it through the conditionals
        // Classic has a resolution of 480 × 320
        if( (screenSize.height == 480 || screenSize.width == 480) && deviceScale == 1.0f ) {
            device = @"iPhone Classic";
        // Retina has a resolution of 960 × 640
        } else if( (screenSize.height == 480 || screenSize.width == 480) && deviceScale == 2.0f ) {
            device = @"iPhone Retina35";
        // Retina 4" has a resolution of 1136 x 640
        } else if (screenSize.height == 568 || screenSize.width == 568 ) {
            device = @"iPhone Retina4";
        // iPhone 6 has a resolution of 1334 by 750
        } else if (screenSize.height == 667 || screenSize.width == 667 ) {
            device = @"iPhone 6";
        // iPhone 6 Plus has a resolution of 1920 by 1080
        // Reported size is 736 x 414
        } else if (screenSize.height == 736 || screenSize.width == 736 ) {
            device = @"iPhone 6 Plus";
        }

    } else if (UI_USER_INTERFACE_IDIOM() == UIUserInterfaceIdiomPad) {
        device = @"iPad Classic"; // Just in case it doesn't make it through the conditionals
        if(deviceScale == 1.0f) {
            device = @"iPad Classic";
        } else if (deviceScale == 2.0f) {
            device = @"iPad Retina";
        }
    }
    //NSLog(@"The device is %@ scale is %f and the height is %f and width is %f", device, deviceScale, screenSize.height, screenSize.width);

    return device;
}

Removing items from NSMutableArray’s

I have an NSMutableArray in Objective-C that I want to remove items from so that it has just the number of items that will be displayed in a grid on the screen. The number of items varies, but on one screen it is 9. The array has more items, but I don’t necessarily know how many. [Remember that array items are numbered with an index starting at 0. So the last index number of my array of 9 items is 8′]

This is the original code that I tried.


NSUInteger itemsOnScreen = 9;
for (NSUInteger i = itemsOnScreen; i < gridItems.count; i++) {
    [gridItems removeObjectAtIndex:i];
}

This code doesn’t delete all of the items so I decided to start at the end and delete items until I there were only 9 left. This is the code that I ended up using.


NSUInteger itemsOnScreen = 9;

for (NSUInteger i = gridItems.count - 1; i > itemsOnScreen - 1; i--) {
    [gridItems removeObjectAtIndex:i];
}

It’s kind of ugly and after working with it it occurred to me why the original code didn’t work. As I started deleting items, the number of items, and hence the index of the last item changed. So it worked fine for the first few, but as I neared the end of the loop, there were no items with an index that matched i. If I just delete the first item after the 9 that I want, then the loop works fine.


NSUInteger itemsOnScreen = 9;
for (NSUInteger i = 0; i < gridItems.count; i++) {
    [gridItems removeObjectAtIndex:itemsOnScreen];
}

UIImage Crash on iPod Touch

While testing my app on an iPod Touch I started getting an out of memory crash. It turns out that when using imageNamed: iOS keeps the picture around in case it is needed later. It is supposed to remove it from memory when it needs more memory, but it is slow to do so and causes the app to crash. I replaced it with imageWithContentsOfFile: and the crashes went away.

VM Tracker.png


/ Put the picture on the screen. Most will be jpegs
    //NSString *pictFileName = [NSString stringWithFormat:@"%@.jpg",pictName];
    NSString *pictFile = [[NSBundle mainBundle] pathForResource:pictName ofType:@"jpg"];
    if (  [PICT_TYPE isEqualToString:@"png"] ) {
        //pictFileName = [NSString stringWithFormat:@"%@.png",pictName];
        pictFile = [[NSBundle mainBundle] pathForResource:pictName ofType:@"png"];
    }
    
    //self.imageToDisplay  = [UIImage imageNamed:pictFileName];
    self.imageToDisplay = [UIImage imageWithContentsOfFile:pictFile];
    

From the documentation for imageNamed:,

This method looks in the system caches for an image object with the specified name and returns that object if it exists…
If you have an image file that will only be displayed once and wish to ensure that it does not get added to the system’s cache, you should instead create your image using imageWithContentsOfFile:. This will keep your single-use image out of the system image cache, potentially improving the memory use characteristics of your app.

So for all of my icons that remain on the screen, e.g. microphone, speaker, checkboxes, I use imageNamed:. They are small and reused so they belong in the cache. For the main image on the screen, which is large, there will most likely be lots of other images used before it is used again. The cache will be purged before the app gets around to using it again so there is no point to putting it there in the first place.

Removing subviews from a view.

In my apps, I use swipe gestures to move to the next screen. The old stuff is animated off to the left and the new stuff animates in from the right. If the user rotates the device, I need to remove the elements of the view from the main view and redisplay them in the new orientation. I also need to remove the animations if they are occurring. I have lots of different layouts, but each layout has this method in it. (The contents vary a bit.)

I first remove the animations. Then I remove the views from the main view. Then I set the views to nil to make sure their resources are released.


- (void)removeAllObjectsFromParentView {
    [self.wordView.layer removeAllAnimations];
    [self.categoryView.layer removeAllAnimations];
    
    [self.wordView removeFromSuperview];
    [self.categoryView removeFromSuperview];
   
    self.wordView = nil;
    self.categoryView = nil;
}

All of the subviews of wordView and categoryView will be removed and released when the parent view is removed and released.