Validating apps so they will run on original iPads

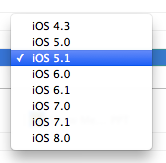
Most of my apps were built with iOS4 or iOS5. They don’t require any of the new features of iOS6,7,8 so they will run fine on older devices that can’t upgrade. (I do have conditional code for iOS7s look and feel, and of course they run on the new iPhone sizes.) The original iPads will run iOS 5.1.1 but not any version that is newer. Unfortunately, the dropdown for choosing the minimum deployment target only lists iOS 5.1, which won’t validate.

Deployment dropdown

So how do you change this,
Deployment 5.1
to this?
Deployment 5.1.1

In my case I happen to be lucky in that Xcode 5 asked me if I wanted to fix the error and fixed it for me. So my project default is 5.1.1 and my problem is just to get it into the build settings. After much experimentation, I discovered that bringing up the deployment dropdown in the build phases column, closing it, then hitting the delete key fills in the box with the project default. I don’t know how to get the project default to contain 5.1.1 if it doesn’t already.

Processing remove requests and bad email addresses in our customer list.

Update 2016-05-25. I found a much easier way.

Remove Requests

We don’t like to bother our customers with lots of emails, but from time to time we let them know about new products and sales. Some of them use the remove link on the bottom of the email to unsubscribe from the list. I have a rule in Apple Mail that automatically routes the remove response to a folder. We usually get a couple of remove requests each time we send out a mailing and we usually process them manually. I wanted to automate the process a bit and create a master list of email addresses that do not want our mailings. That way if someone orders from us under a different name or address, we won’t be sending them email if they opted out earlier.

After looking around in the Library/Mail folder it looks like our Remove folder is located at


 ~/Library/Mail/V2/Mailboxes/Remove.mbox/

I CD to that folder and then redirect the results of a recursive grep command to a file on the desktop. Since they are responding to our email, I look for the From: portion of the email. Note the period after the search term. I means to look for all files in the current directory. The -r says to look in all files in directories below this one too.


grep -r "From: " . > ~/Desktop/Remove.txt

Then I open the file in BBEdit and remove extra lines, e.g. anything with our company name.

I only want the email addresses, so I can use this grep line to remove everything before the address.


.*<

I can remove everything after the address with this.

>.*

Sort the lines and process duplicates and you’re done. I then import the email addresses into my MySQL database.

Bad Domain

Our mail server will try to find missing domains for a few days and generates warning messages. When it finally gives up it generates a message with the subject “Returned mail: see transcript for details”. The nice thing about these messages is that the failed address is easy to find. It looks like this:


The following address(es) failed:

 abby612@earthink.net
   retry timeout exceeded

In this case it probably couldn’t find the server because it was looking for earthink but the email was probably to earthlink. When I pull them out of the failure message, I correct obvious mis-typing before adding them to the bad email database.
The code to find the addresses is:


grep -r "^ .*@.*$" . > ~/Desktop/Failed.txt

The code looks for lines starting with a space, then an email address, then the end of the line. There are surprisingly few false positives e.g. lines that contain other things than just an email address.

Bad Addresses

It’s much harder to remove the bad email addresses since the format from different email providers varies tremendously. I ended up looking for lines that contain an “@” and doing a lot of manual cleanup. I’ll see if I can figure out a better way next month.

Icon Sizes for New iPhones and iOS8

To view the sizes, select the blank image space that you are interested in and click the size inspector. The size shows up at the bottom RHS along with the iOS version that it is targeted to.

Your screen should look something like this.
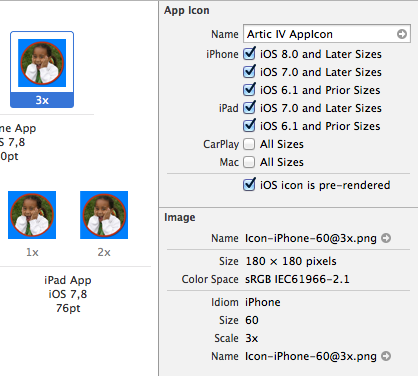
App icon sizes

iPhone 6 requires two new images.

180×180
Icon-iPhone-60@3x.png

87×87
Icon-Small@3x.png

If you look at the JSON for the appiconset it should look something like this. The first line has the sizes. Note that some icons are used in multiple places. The names are arbitrary but I kept the same naming convention as before.


{
  "images" : [
    {
      "size" : "29x29",
      "idiom" : "iphone",
      "filename" : "Icon-Small.png",
      "scale" : "1x"
    },
    {
      "size" : "29x29",
      "idiom" : "iphone",
      "filename" : "Icon-Small@2x.png",
      "scale" : "2x"
    },
    {
      "size" : "29x29",
      "idiom" : "iphone",
      "filename" : "Icon-Small@3x.png",
      "scale" : "3x"
    },
    {
      "size" : "40x40",
      "idiom" : "iphone",
      "filename" : "Icon-40@2x.png",
      "scale" : "2x"
    },
    {
      "size" : "40x40",
      "idiom" : "iphone",
      "filename" : "Icon-iPhone-60@2x.png",
      "scale" : "3x"
    },
    {
      "size" : "57x57",
      "idiom" : "iphone",
      "filename" : "Icon.png",
      "scale" : "1x"
    },
    {
      "size" : "57x57",
      "idiom" : "iphone",
      "filename" : "Icon@2x.png",
      "scale" : "2x"
    },
    {
      "size" : "60x60",
      "idiom" : "iphone",
      "filename" : "Icon-iPhone-60@2x.png",
      "scale" : "2x"
    },
    {
      "size" : "60x60",
      "idiom" : "iphone",
      "filename" : "Icon-iPhone-60@3x.png",
      "scale" : "3x"
    },
    {
      "size" : "29x29",
      "idiom" : "ipad",
      "filename" : "Icon-Small.png",
      "scale" : "1x"
    },
    {
      "size" : "29x29",
      "idiom" : "ipad",
      "filename" : "Icon-Small@2x.png",
      "scale" : "2x"
    },
    {
      "size" : "40x40",
      "idiom" : "ipad",
      "filename" : "Icon-40.png",
      "scale" : "1x"
    },
    {
      "size" : "40x40",
      "idiom" : "ipad",
      "filename" : "Icon-40@2x.png",
      "scale" : "2x"
    },
    {
      "size" : "50x50",
      "idiom" : "ipad",
      "filename" : "Icon-Small-50.png",
      "scale" : "1x"
    },
    {
      "size" : "50x50",
      "idiom" : "ipad",
      "filename" : "Icon-Small-50@2x.png",
      "scale" : "2x"
    },
    {
      "size" : "72x72",
      "idiom" : "ipad",
      "filename" : "Icon-72.png",
      "scale" : "1x"
    },
    {
      "size" : "72x72",
      "idiom" : "ipad",
      "filename" : "Icon-72@2x.png",
      "scale" : "2x"
    },
    {
      "size" : "76x76",
      "idiom" : "ipad",
      "filename" : "Icon-iPad-76.png",
      "scale" : "1x"
    },
    {
      "size" : "76x76",
      "idiom" : "ipad",
      "filename" : "Icon-iPad-76@2x.png",
      "scale" : "2x"
    }
  ],
  "info" : {
    "version" : 1,
    "author" : "xcode"
  },
  "properties" : {
    "pre-rendered" : true
  }
}
MySQL: Find values in two tables

I have a list of email addresses of people who no longer wish to get my product newsletter. I have another list of customers. I want to make sure that even if they bought something and got a confirmation email, that they don’t get a newsletter email. This code finds the ones who do not want to get the newsletter.


SELECT * FROM customers JOIN remove ON remove.email = customers.email

Background images for iOS

I have 27 apps in the store and did not want to create and manage new backgrounds for each of them. And I suspect that there will be more sizes in the future. So what I did was create an 1800×1800 image for each app. They are mostly around 300-400KB. Then in viewWillAppear I call this method.


- (void)pickBackgroundImage {

    UIInterfaceOrientation orientation = [[UIApplication sharedApplication] statusBarOrientation];
    CGFloat scale = [UIScreen mainScreen].scale;
    CGPoint midPoint = [Utilities findMidpoint:self.view];

    NSString *pictFile = [[NSBundle mainBundle] pathForResource:@"Background" ofType:@"png"];
    UIImage *imageToDisplay = [UIImage imageWithContentsOfFile:pictFile];
    imageToDisplay  = [UIImage imageWithCGImage:imageToDisplay.CGImage scale:scale orientation:imageToDisplay.imageOrientation];

    CGRect pictFrame;
    if(orientation == UIInterfaceOrientationPortrait || orientation == UIInterfaceOrientationPortraitUpsideDown) {
        CGFloat imageWidth = (unsigned int)(.9f * self.view.frame.size.width);
        pictFrame = CGRectMake(midPoint.x - imageWidth/2, midPoint.y - imageWidth/2, imageWidth, imageWidth);
        pictFrame.origin.y = self.view.frame.origin.y + .3f * pictFrame.origin.y;
    } else {
        CGFloat imageWidth = (unsigned int)(self.view.frame.size.height - 20 - 44);
        pictFrame = CGRectMake(midPoint.x - imageWidth/2, midPoint.y - imageWidth/2, imageWidth, imageWidth);
        pictFrame.origin.y = 10;
    }
    self.BGView = [[UIImageView alloc] initWithImage:imageToDisplay];
    self.BGView.frame = pictFrame;
    self.BGView.contentMode = UIViewContentModeScaleAspectFit;

    [self.view insertSubview:self.BGView atIndex:0];
}

The arithmetic is a little tricky, but basically I figure out how big the screen is, then subtract the menubar and bottom bar. Then fill 90% of whats left with the image. I use the scale factor, CGFloat scale = [UIScreen mainScreen].scale;, to make the device think that the image was created just for it, e.g. @2x or @3x.

Works in the simulator for all devices. I don’t have a new phone so I haven’t been able to test it on one yet.